> ## Documentation Index
> Fetch the complete documentation index at: https://trigger-docs-build-extensions.mintlify.site/llms.txt
> Use this file to discover all available pages before exploring further.
# Self-hosting
> You can self-host Trigger.dev on your own infrastructure.
## Overview
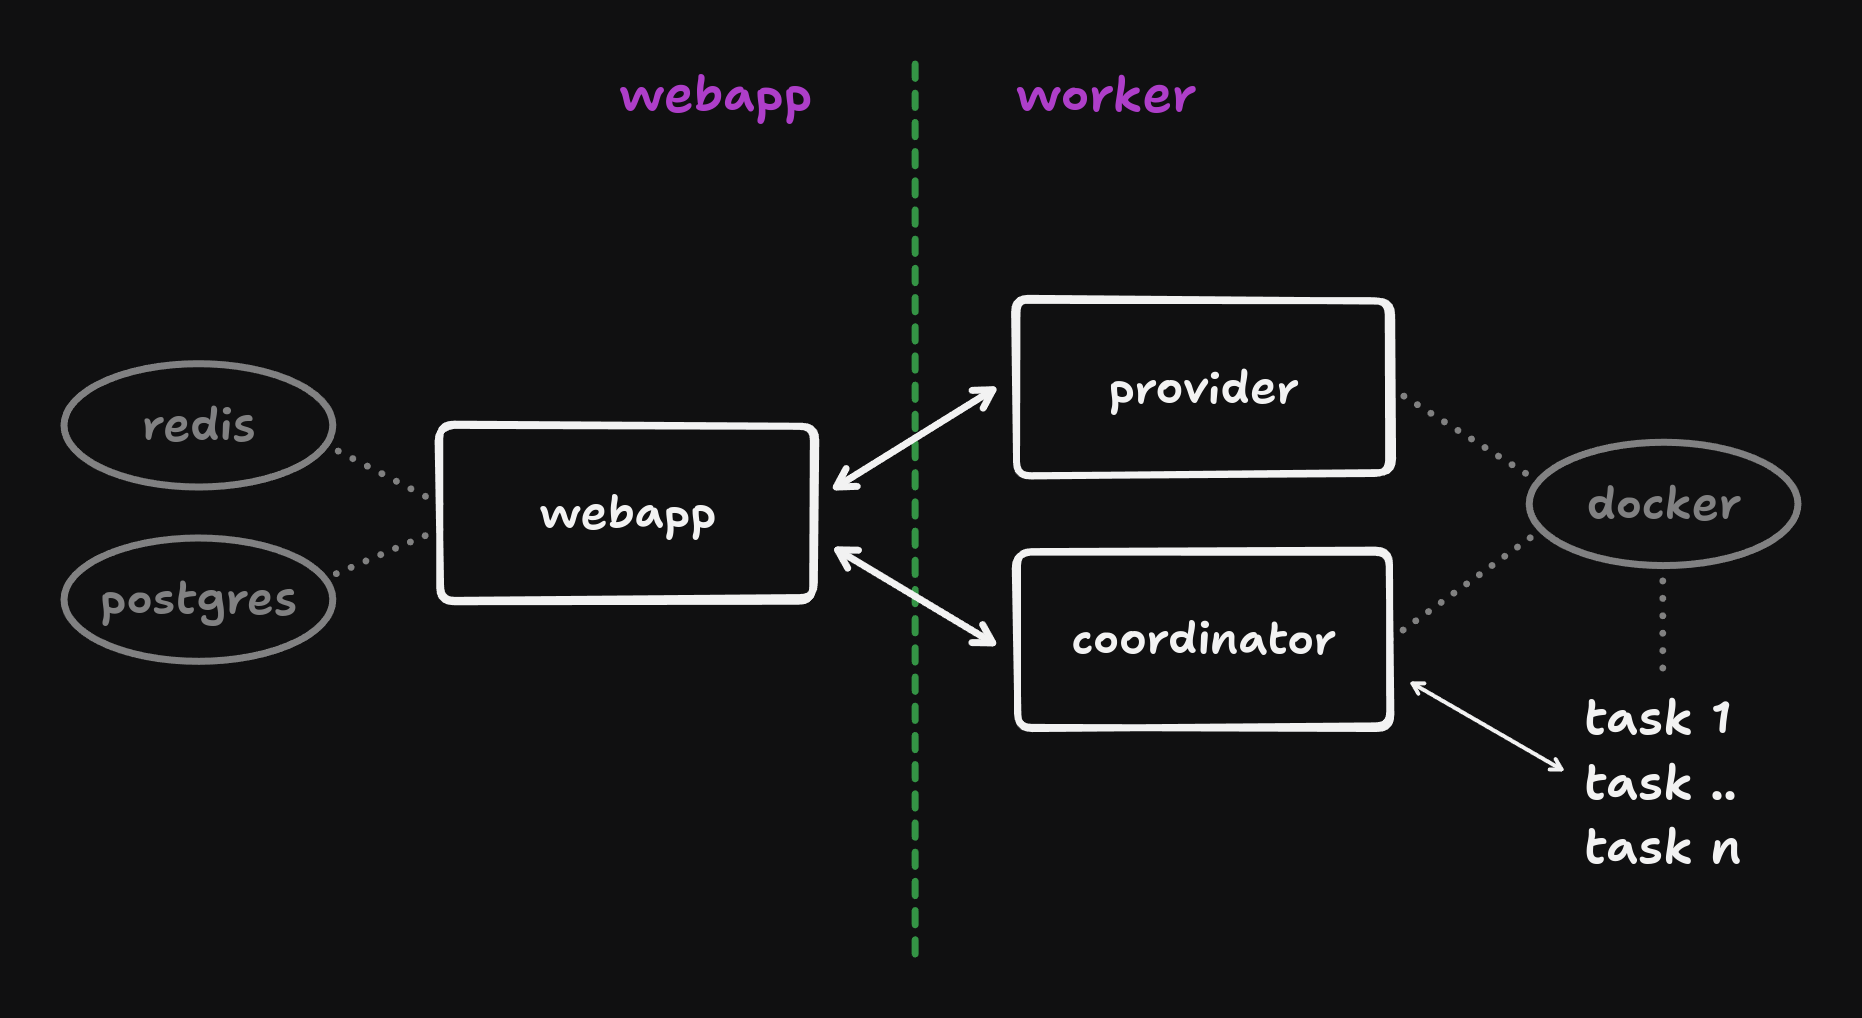 The self-hosting guide comes in two parts. The first part is a simple setup where you run everything on one server. In the second part, the webapp and worker components are split on two separate machines.
You're going to need at least one Debian (or derivative) machine with Docker and Docker Compose installed. We'll also use Ngrok to expose the webapp to the internet.
## Caveats
The v3 worker components don't have ARM support yet.
This guide outlines a quick way to start self-hosting Trigger.dev. Scaling, security, and reliability concerns are not fully addressed here. It's unlikely to result in a production-ready deployment on its own, but it's a good starting point.
As self-hosted deployments tend to have unique requirements and configurations, we don't provide specific advice for scaling up or improving security and reliability.
Should the burden ever get too much, we'd be happy to see you on [Trigger.dev cloud](https://trigger.dev/pricing) where we deal with these concerns for you.
* The Docker [checkpoint command](https://docs.docker.com/reference/cli/docker/checkpoint/) is an
experimental feature which may not work as expected. It won't be enabled by default. Instead, the
containers will stay up and their processes frozen. They won't consume CPU but they *will* consume
RAM. - The Docker provider does not currently enforce any resource limits. This means your tasks
can consume up to the total machine CPU and RAM. Having no limits may be preferable when
self-hosting, but can impact the performance of other services. - The worker components (not the
tasks!) have direct access to the Docker socket. This means they can run any Docker command. To
restrict access, you may want to consider using [Docker Socket
Proxy](https://github.com/Tecnativa/docker-socket-proxy). - The task containers are running with
host networking. This means there is no network isolation between them and the host machine. They
will be able to access any networked service on the host. - There is currently no support for
adding multiple worker machines. This would require a more elaborate provider, or possibly a
switch to Docker Swarm. This is not currently planned, but you are welcome to
[contribute](https://github.com/triggerdotdev/trigger.dev/blob/main/CONTRIBUTING.md).
## Requirements
* 4 CPU
* 8 GB RAM
* Debian or derivative
* Optional: A separate machine for the worker components
You will also need a way to expose the webapp to the internet. This can be done with a reverse proxy, or with a service like Ngrok. We will be using the latter in this guide.
## Part 1: Single server
This is the simplest setup. You run everything on one server. It's a good option if you have spare capacity on an existing machine, and have no need to independently scale worker capacity.
### Server setup
Some very basic steps to get started:
1. [Install Docker](https://docs.docker.com/get-docker/)
2. [Install Docker Compose](https://docs.docker.com/compose/install/)
3. [Install Ngrok](https://ngrok.com/download)
On a Debian server, you can install everything you need with the following commands:
```bash theme={null}
curl -s https://ngrok-agent.s3.amazonaws.com/ngrok.asc | \
sudo tee /etc/apt/trusted.gpg.d/ngrok.asc >/dev/null && \
echo "deb https://ngrok-agent.s3.amazonaws.com buster main" | \
sudo tee /etc/apt/sources.list.d/ngrok.list
sudo apt-get update
sudo apt-get install -y \
docker.io \
docker-compose \
ngrok
```
### Trigger.dev setup
1. Clone the [Trigger.dev docker repository](https://github.com/triggerdotdev/docker) and checkout the v3 branch
```bash theme={null}
git clone https://github.com/triggerdotdev/docker
cd docker
```
2. Run the start script and follow the prompts
```bash theme={null}
./start.sh # hint: you can append -d to run in detached mode
```
#### Manual
Alternatively, you can follow these manual steps after cloning the docker repo:
1. Create the `.env` file
```bash theme={null}
cp .env.example .env
```
2. Generate the required secrets
```bash theme={null}
echo MAGIC_LINK_SECRET=$(openssl rand -hex 16)
echo SESSION_SECRET=$(openssl rand -hex 16)
echo ENCRYPTION_KEY=$(openssl rand -hex 16)
echo PROVIDER_SECRET=$(openssl rand -hex 32)
echo COORDINATOR_SECRET=$(openssl rand -hex 32)
```
3. Replace the default secrets in the `.env` file with the generated ones
4. Run docker compose to start the services
```bash theme={null}
. lib.sh # source the helper function
docker_compose -p=trigger up
```
### Tunnelling
You will need to expose the webapp to the internet. You can use Ngrok for this. If you already have a working reverse proxy setup and a domain, you can skip to the last step.
1. Start Ngrok. You may get prompted to sign up - it's free.
```bash theme={null}
./tunnel.sh
```
2. Copy the domain from the output, for example: `1234-42-42-42-42.ngrok-free.app`
3. Uncomment the `TRIGGER_PROTOCOL` and `TRIGGER_DOMAIN` lines in the `.env` file. Set it to the domain you copied.
```bash theme={null}
TRIGGER_PROTOCOL=https
TRIGGER_DOMAIN=1234-42-42-42-42.ngrok-free.app
```
4. Quit the start script and launch it again, or run this:
```bash theme={null}
./stop.sh && ./start.sh
```
### Registry setup
If you want to deploy v3 projects, you will need access to a Docker registry. The [CLI deploy](/cli-deploy) command will push the images, and then the worker machine can pull them when needed. We will use Docker Hub as an example.
1. Sign up for a free account at [Docker Hub](https://hub.docker.com/)
2. Edit the `.env` file and add the registry details
```bash theme={null}
DEPLOY_REGISTRY_HOST=docker.io
DEPLOY_REGISTRY_NAMESPACE=
```
3. Log in to Docker Hub both locally and your server. For the split setup, this will be the worker machine. You may want to create an [access token](https://hub.docker.com/settings/security) for this.
```bash theme={null}
docker login -u
```
4. Restart the services
```bash theme={null}
./stop.sh && ./start.sh
```
5. You can now deploy v3 projects using the CLI with these flags:
```
npx trigger.dev@latest deploy --self-hosted --push
```
## Part 2: Split services
With this setup, the webapp will run on a different machine than the worker components. This allows independent scaling of your workload capacity.
### Webapp setup
All steps are the same as in Part 1, except for the following:
1. Run the start script with the `webapp` argument
```bash theme={null}
./start.sh webapp
```
2. Tunnelling is now *required*. Please follow the tunnelling section from above.
### Worker setup
1. Copy your `.env` file from the webapp to the worker machine
```bash theme={null}
# an example using scp
scp -3 root@:docker/.env root@:docker/.env
```
2. Run the start script with the `worker` argument
```bash theme={null}
./start.sh worker
```
2. Tunnelling is *not* required for the worker components.
## Checkpoint support
This requires an *experimental Docker feature*. Successfully checkpointing a task today, does not
mean you will be able to restore it tomorrow. Your data may be lost. You've been warned!
Checkpointing allows you to save the state of a running container to disk and restore it later. This can be useful for
long-running tasks that need to be paused and resumed without losing state. Think fan-out and fan-in, or long waits in email campaigns.
The checkpoints will be pushed to the same registry as the deployed images. Please see the [Registry setup](#registry-setup) section for more information.
### Requirements
* Debian, **NOT** a derivative like Ubuntu
* Additional storage space for the checkpointed containers
### Setup
Underneath the hood this uses Checkpoint and Restore in Userspace, or [CRIU](https://github.com/checkpoint-restore/criu) in short. We'll have to do a few things to get this working:
1. Install CRIU
```bash theme={null}
sudo apt-get update
sudo apt-get install criu
```
2. Tweak the config so we can successfully checkpoint our workloads
```bash theme={null}
mkdir -p /etc/criu
cat << EOF >/etc/criu/runc.conf
tcp-close
EOF
```
3. Make sure everything works
```bash theme={null}
sudo criu check
```
3. Enable Docker experimental features, by adding the following to `/etc/docker/daemon.json`
```json theme={null}
{
"experimental": true
}
```
4. Restart the Docker daemon
```bash theme={null}
sudo systemctl restart docker
```
5. Uncomment `FORCE_CHECKPOINT_SIMULATION=0` in your `.env` file. Alternatively, run this:
```bash theme={null}
echo "FORCE_CHECKPOINT_SIMULATION=0" >> .env
```
6. Restart the services
```bash theme={null}
# if you're running everything on the same machine
./stop.sh && ./start.sh
# if you're running the worker on a different machine
./stop.sh worker && ./start.sh worker
```
## Updating
Once you have everything set up, you will periodically want to update your Docker images. You can easily do this by running the update script and restarting your services:
```bash theme={null}
./update.sh
./stop.sh && ./start.sh
```
Sometimes, we will make more extensive changes that require pulling updated compose files, scripts, etc from our docker repo:
```bash theme={null}
git pull
./stop.sh && ./start.sh
```
Occasionally, you may also have to update your `.env` file, but we will try to keep these changes to a minimum. Check the `.env.example` file for new variables.
### From beta
If you're coming from the beta CLI package images, you will need to:
* **Stash you changes.** If you made any changes, stash them with `git stash`.
* **Switch branches.** We moved back to main. Run `git checkout main` in your docker repo.
* **Pull in updates.** We've added a new container for [Electric](https://github.com/electric-sql/electric) and made some other improvements. Run `git pull` to get the latest updates.
* **Apply your changes.** If you stashed your changes, apply them with `git stash pop`.
* **Update your images.** We've also published new images. Run `./update.sh` to pull them.
* **Restart all services.** Run `./stop.sh && ./start.sh` and you're good to go.
In summary, run this wherever you cloned the docker repo:
```bash theme={null}
# if you made changes
git stash
# switch to the main branch and pull the latest changes
git checkout main
git pull
# if you stashed your changes
git stash pop
# update and restart your services
./update.sh
./stop.sh && ./start.sh
```
## Version locking
There are several reasons to lock the version of your Docker images:
* **Backwards compatibility.** We try our best to maintain compatibility with older CLI versions, but it's not always possible. If you don't want to update your CLI, you can lock your Docker images to that specific version.
* **Ensuring full feature support.** Sometimes, new CLI releases will also require new or updated platform features. Running unlocked images can make any issues difficult to debug. Using a specific tag can help here as well.
By default, the images will point at the latest versioned release via the `v3` tag. You can override this by specifying a different tag in your `.env` file. For example:
```bash theme={null}
TRIGGER_IMAGE_TAG=v3.0.4
```
## CLI usage
This section highlights some of the CLI commands and options that are useful when self-hosting. Please check the [CLI reference](/cli-introduction) for more in-depth documentation.
### Login
To avoid being redirected to the [Trigger.dev Cloud](https://cloud.trigger.dev) login page when using the CLI, you can specify the URL of your self-hosted instance with the `--api-url` or `-a` flag. For example:
```bash theme={null}
npx trigger.dev@latest login -a http://trigger.example.com
```
Once you've logged in, the CLI will remember your login details and you won't need to specify the URL again with other commands.
#### Custom profiles
You can specify a custom profile when logging in. This allows you to easily use the CLI with our cloud product and your self-hosted instance at the same time. For example:
```
npx trigger.dev@latest login -a http://trigger.example.com --profile my-profile
```
You can then use this profile with other commands:
```
npx trigger.dev@latest dev --profile my-profile
```
To list all your profiles, use the `list-profiles` command:
```
npx trigger.dev@latest list-profiles
```
#### Verify login
It can be useful to check you have successfully logged in to the correct instance. You can do this with the `whoami` command, which will also show the API URL:
```bash theme={null}
npx trigger.dev@latest whoami
# with a custom profile
npx trigger.dev@latest whoami --profile my-profile
```
### Deploy
On [Trigger.dev Cloud](https://cloud.trigger.dev), we build deployments remotely and push those images for you. When self-hosting you will have to do that locally yourself. This can be done with the `--self-hosted` and `--push` flags. For example:
```
npx trigger.dev@latest deploy --self-hosted --push
```
### CI / GitHub Actions
When running the CLI in a CI environment, your login profiles won't be available. Instead, you can use the `TRIGGER_API_URL` and `TRIGGER_ACCESS_TOKEN` environment
variables to point at your self-hosted instance and authenticate.
For more detailed instructions, see the [GitHub Actions guide](/github-actions).
## Telemetry
By default, the Trigger.dev webapp sends telemetry data to our servers. This data is used to improve the product and is not shared with third parties. If you would like to opt-out of this, you can set the `TRIGGER_TELEMETRY_DISABLED` environment variable in your `.env` file. The value doesn't matter, it just can't be empty. For example:
```bash theme={null}
TRIGGER_TELEMETRY_DISABLED=1
```
The self-hosting guide comes in two parts. The first part is a simple setup where you run everything on one server. In the second part, the webapp and worker components are split on two separate machines.
You're going to need at least one Debian (or derivative) machine with Docker and Docker Compose installed. We'll also use Ngrok to expose the webapp to the internet.
## Caveats
The v3 worker components don't have ARM support yet.
This guide outlines a quick way to start self-hosting Trigger.dev. Scaling, security, and reliability concerns are not fully addressed here. It's unlikely to result in a production-ready deployment on its own, but it's a good starting point.
As self-hosted deployments tend to have unique requirements and configurations, we don't provide specific advice for scaling up or improving security and reliability.
Should the burden ever get too much, we'd be happy to see you on [Trigger.dev cloud](https://trigger.dev/pricing) where we deal with these concerns for you.
* The Docker [checkpoint command](https://docs.docker.com/reference/cli/docker/checkpoint/) is an
experimental feature which may not work as expected. It won't be enabled by default. Instead, the
containers will stay up and their processes frozen. They won't consume CPU but they *will* consume
RAM. - The Docker provider does not currently enforce any resource limits. This means your tasks
can consume up to the total machine CPU and RAM. Having no limits may be preferable when
self-hosting, but can impact the performance of other services. - The worker components (not the
tasks!) have direct access to the Docker socket. This means they can run any Docker command. To
restrict access, you may want to consider using [Docker Socket
Proxy](https://github.com/Tecnativa/docker-socket-proxy). - The task containers are running with
host networking. This means there is no network isolation between them and the host machine. They
will be able to access any networked service on the host. - There is currently no support for
adding multiple worker machines. This would require a more elaborate provider, or possibly a
switch to Docker Swarm. This is not currently planned, but you are welcome to
[contribute](https://github.com/triggerdotdev/trigger.dev/blob/main/CONTRIBUTING.md).
## Requirements
* 4 CPU
* 8 GB RAM
* Debian or derivative
* Optional: A separate machine for the worker components
You will also need a way to expose the webapp to the internet. This can be done with a reverse proxy, or with a service like Ngrok. We will be using the latter in this guide.
## Part 1: Single server
This is the simplest setup. You run everything on one server. It's a good option if you have spare capacity on an existing machine, and have no need to independently scale worker capacity.
### Server setup
Some very basic steps to get started:
1. [Install Docker](https://docs.docker.com/get-docker/)
2. [Install Docker Compose](https://docs.docker.com/compose/install/)
3. [Install Ngrok](https://ngrok.com/download)
On a Debian server, you can install everything you need with the following commands:
```bash theme={null}
curl -s https://ngrok-agent.s3.amazonaws.com/ngrok.asc | \
sudo tee /etc/apt/trusted.gpg.d/ngrok.asc >/dev/null && \
echo "deb https://ngrok-agent.s3.amazonaws.com buster main" | \
sudo tee /etc/apt/sources.list.d/ngrok.list
sudo apt-get update
sudo apt-get install -y \
docker.io \
docker-compose \
ngrok
```
### Trigger.dev setup
1. Clone the [Trigger.dev docker repository](https://github.com/triggerdotdev/docker) and checkout the v3 branch
```bash theme={null}
git clone https://github.com/triggerdotdev/docker
cd docker
```
2. Run the start script and follow the prompts
```bash theme={null}
./start.sh # hint: you can append -d to run in detached mode
```
#### Manual
Alternatively, you can follow these manual steps after cloning the docker repo:
1. Create the `.env` file
```bash theme={null}
cp .env.example .env
```
2. Generate the required secrets
```bash theme={null}
echo MAGIC_LINK_SECRET=$(openssl rand -hex 16)
echo SESSION_SECRET=$(openssl rand -hex 16)
echo ENCRYPTION_KEY=$(openssl rand -hex 16)
echo PROVIDER_SECRET=$(openssl rand -hex 32)
echo COORDINATOR_SECRET=$(openssl rand -hex 32)
```
3. Replace the default secrets in the `.env` file with the generated ones
4. Run docker compose to start the services
```bash theme={null}
. lib.sh # source the helper function
docker_compose -p=trigger up
```
### Tunnelling
You will need to expose the webapp to the internet. You can use Ngrok for this. If you already have a working reverse proxy setup and a domain, you can skip to the last step.
1. Start Ngrok. You may get prompted to sign up - it's free.
```bash theme={null}
./tunnel.sh
```
2. Copy the domain from the output, for example: `1234-42-42-42-42.ngrok-free.app`
3. Uncomment the `TRIGGER_PROTOCOL` and `TRIGGER_DOMAIN` lines in the `.env` file. Set it to the domain you copied.
```bash theme={null}
TRIGGER_PROTOCOL=https
TRIGGER_DOMAIN=1234-42-42-42-42.ngrok-free.app
```
4. Quit the start script and launch it again, or run this:
```bash theme={null}
./stop.sh && ./start.sh
```
### Registry setup
If you want to deploy v3 projects, you will need access to a Docker registry. The [CLI deploy](/cli-deploy) command will push the images, and then the worker machine can pull them when needed. We will use Docker Hub as an example.
1. Sign up for a free account at [Docker Hub](https://hub.docker.com/)
2. Edit the `.env` file and add the registry details
```bash theme={null}
DEPLOY_REGISTRY_HOST=docker.io
DEPLOY_REGISTRY_NAMESPACE=
```
3. Log in to Docker Hub both locally and your server. For the split setup, this will be the worker machine. You may want to create an [access token](https://hub.docker.com/settings/security) for this.
```bash theme={null}
docker login -u
```
4. Restart the services
```bash theme={null}
./stop.sh && ./start.sh
```
5. You can now deploy v3 projects using the CLI with these flags:
```
npx trigger.dev@latest deploy --self-hosted --push
```
## Part 2: Split services
With this setup, the webapp will run on a different machine than the worker components. This allows independent scaling of your workload capacity.
### Webapp setup
All steps are the same as in Part 1, except for the following:
1. Run the start script with the `webapp` argument
```bash theme={null}
./start.sh webapp
```
2. Tunnelling is now *required*. Please follow the tunnelling section from above.
### Worker setup
1. Copy your `.env` file from the webapp to the worker machine
```bash theme={null}
# an example using scp
scp -3 root@:docker/.env root@:docker/.env
```
2. Run the start script with the `worker` argument
```bash theme={null}
./start.sh worker
```
2. Tunnelling is *not* required for the worker components.
## Checkpoint support
This requires an *experimental Docker feature*. Successfully checkpointing a task today, does not
mean you will be able to restore it tomorrow. Your data may be lost. You've been warned!
Checkpointing allows you to save the state of a running container to disk and restore it later. This can be useful for
long-running tasks that need to be paused and resumed without losing state. Think fan-out and fan-in, or long waits in email campaigns.
The checkpoints will be pushed to the same registry as the deployed images. Please see the [Registry setup](#registry-setup) section for more information.
### Requirements
* Debian, **NOT** a derivative like Ubuntu
* Additional storage space for the checkpointed containers
### Setup
Underneath the hood this uses Checkpoint and Restore in Userspace, or [CRIU](https://github.com/checkpoint-restore/criu) in short. We'll have to do a few things to get this working:
1. Install CRIU
```bash theme={null}
sudo apt-get update
sudo apt-get install criu
```
2. Tweak the config so we can successfully checkpoint our workloads
```bash theme={null}
mkdir -p /etc/criu
cat << EOF >/etc/criu/runc.conf
tcp-close
EOF
```
3. Make sure everything works
```bash theme={null}
sudo criu check
```
3. Enable Docker experimental features, by adding the following to `/etc/docker/daemon.json`
```json theme={null}
{
"experimental": true
}
```
4. Restart the Docker daemon
```bash theme={null}
sudo systemctl restart docker
```
5. Uncomment `FORCE_CHECKPOINT_SIMULATION=0` in your `.env` file. Alternatively, run this:
```bash theme={null}
echo "FORCE_CHECKPOINT_SIMULATION=0" >> .env
```
6. Restart the services
```bash theme={null}
# if you're running everything on the same machine
./stop.sh && ./start.sh
# if you're running the worker on a different machine
./stop.sh worker && ./start.sh worker
```
## Updating
Once you have everything set up, you will periodically want to update your Docker images. You can easily do this by running the update script and restarting your services:
```bash theme={null}
./update.sh
./stop.sh && ./start.sh
```
Sometimes, we will make more extensive changes that require pulling updated compose files, scripts, etc from our docker repo:
```bash theme={null}
git pull
./stop.sh && ./start.sh
```
Occasionally, you may also have to update your `.env` file, but we will try to keep these changes to a minimum. Check the `.env.example` file for new variables.
### From beta
If you're coming from the beta CLI package images, you will need to:
* **Stash you changes.** If you made any changes, stash them with `git stash`.
* **Switch branches.** We moved back to main. Run `git checkout main` in your docker repo.
* **Pull in updates.** We've added a new container for [Electric](https://github.com/electric-sql/electric) and made some other improvements. Run `git pull` to get the latest updates.
* **Apply your changes.** If you stashed your changes, apply them with `git stash pop`.
* **Update your images.** We've also published new images. Run `./update.sh` to pull them.
* **Restart all services.** Run `./stop.sh && ./start.sh` and you're good to go.
In summary, run this wherever you cloned the docker repo:
```bash theme={null}
# if you made changes
git stash
# switch to the main branch and pull the latest changes
git checkout main
git pull
# if you stashed your changes
git stash pop
# update and restart your services
./update.sh
./stop.sh && ./start.sh
```
## Version locking
There are several reasons to lock the version of your Docker images:
* **Backwards compatibility.** We try our best to maintain compatibility with older CLI versions, but it's not always possible. If you don't want to update your CLI, you can lock your Docker images to that specific version.
* **Ensuring full feature support.** Sometimes, new CLI releases will also require new or updated platform features. Running unlocked images can make any issues difficult to debug. Using a specific tag can help here as well.
By default, the images will point at the latest versioned release via the `v3` tag. You can override this by specifying a different tag in your `.env` file. For example:
```bash theme={null}
TRIGGER_IMAGE_TAG=v3.0.4
```
## CLI usage
This section highlights some of the CLI commands and options that are useful when self-hosting. Please check the [CLI reference](/cli-introduction) for more in-depth documentation.
### Login
To avoid being redirected to the [Trigger.dev Cloud](https://cloud.trigger.dev) login page when using the CLI, you can specify the URL of your self-hosted instance with the `--api-url` or `-a` flag. For example:
```bash theme={null}
npx trigger.dev@latest login -a http://trigger.example.com
```
Once you've logged in, the CLI will remember your login details and you won't need to specify the URL again with other commands.
#### Custom profiles
You can specify a custom profile when logging in. This allows you to easily use the CLI with our cloud product and your self-hosted instance at the same time. For example:
```
npx trigger.dev@latest login -a http://trigger.example.com --profile my-profile
```
You can then use this profile with other commands:
```
npx trigger.dev@latest dev --profile my-profile
```
To list all your profiles, use the `list-profiles` command:
```
npx trigger.dev@latest list-profiles
```
#### Verify login
It can be useful to check you have successfully logged in to the correct instance. You can do this with the `whoami` command, which will also show the API URL:
```bash theme={null}
npx trigger.dev@latest whoami
# with a custom profile
npx trigger.dev@latest whoami --profile my-profile
```
### Deploy
On [Trigger.dev Cloud](https://cloud.trigger.dev), we build deployments remotely and push those images for you. When self-hosting you will have to do that locally yourself. This can be done with the `--self-hosted` and `--push` flags. For example:
```
npx trigger.dev@latest deploy --self-hosted --push
```
### CI / GitHub Actions
When running the CLI in a CI environment, your login profiles won't be available. Instead, you can use the `TRIGGER_API_URL` and `TRIGGER_ACCESS_TOKEN` environment
variables to point at your self-hosted instance and authenticate.
For more detailed instructions, see the [GitHub Actions guide](/github-actions).
## Telemetry
By default, the Trigger.dev webapp sends telemetry data to our servers. This data is used to improve the product and is not shared with third parties. If you would like to opt-out of this, you can set the `TRIGGER_TELEMETRY_DISABLED` environment variable in your `.env` file. The value doesn't matter, it just can't be empty. For example:
```bash theme={null}
TRIGGER_TELEMETRY_DISABLED=1
```